이전 포스팅에서 살펴본 외부 설정 파일의 값 바인딩을 type safe 하게 사용해 보자.
다음은 application.properties 파일이다.
my.name = hongjun
my.age = ${random.int(0,100)}
my.full_name = ${my.name} Choi
먼저 값을 바인딩할 class를 생성해보자.
아래 코드에선 getter, setter가 생략되어 있다.
@Component
@ConfigurationProperties("my")
public class MyProperties {

    String name;

    int age;

    String fullName;
}
보는 바와 같이 @ConfigurationProperties을 이용하면 매우 간단하게 설정 파일의 값을 바인딩할 수 있다.
스프링 부트는 application.properties 파일을 자동으로 감지하기 때문에 @ConfigurationProperties에서 사용할 key값만 지정하여 값을 바인딩할 수 있다.
이전 포스팅에서 사용한 @Valid를 사용한 방법보다 휴먼 미스로 발생할 수 있는 에러 사항을 방지하기 쉽다.
기존에 properties값을 바인딩할 class를 생성할 경우 아래 코드와 같이 @SpringBootApplication이 적용된 main 함수에 @EnableConfigurationProperties 어노테이션을 적용해야 하지만 @ConfigurationProperties를 사용할 경우 이를 생략할 수 있다.
@SpringBootApplication
@EnableConfigurationProperties(MyProperties.class)
public class Application {

    public static void main(String[] args) {
        SpringApplication app = new SpringApplication(Application.class);
        app.setWebApplicationType(WebApplicationType.NONE);
        app.run(args);
    }
}
스프링 부트는 properties값을 바인딩할 때 타입 컨버전(conversion)을 이용한다.
사용자 정의 컨버전이 필요할 경우 아래 3가지 방식으로 제공할 수 있다.
1. ConversionService bean (with a bean named conversionService)
2. custom property editors (through a CustomEditorConfigurer bean)
3. custom Converters (with bean definitions annotated as @ConfigurationPropertiesBinding)
자세한 내용은 아래 doc링크를 확인해 보자
java.time.Duration을 이용한 시간 값 표현도 가능하다.
먼저 타임 값을 세팅해 보자
my.name = hongjun
my.age = ${random.int(0,100)}
my.full_name = ${my.name} Choi
my.session-timeout = 25
25로 지정한 session-timeout를 초 단위로 바인딩해보자.
@DurationUnit(ChronoUnit.SECONDS)와 같은 방식으로 초 단위 시간 값을 지정할 수 있다.
아래 소스에선 기본값이 30초로 지정되었지만 위에서 설정한 25 값으로 인해 오버라이딩되어 25초의 값이 바인딩된다.
getter, setter를 생략하였다.
@Component
@ConfigurationProperties("my")
public class MyProperties {

    String name;

    int age;

    String fullName;

    @DurationUnit(ChronoUnit.SECONDS)
    private Duration sessionTimeout = Duration.ofSeconds(30);

}
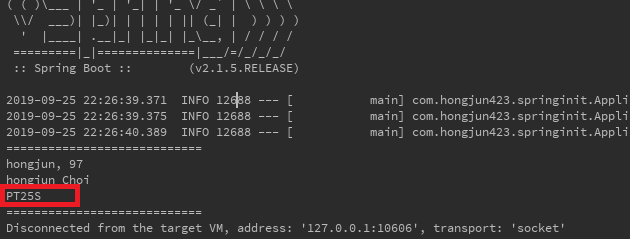
실행해 보면 아래와 같이 25s로 표시되는 것을 볼 수 있다.

properties파일에서 25가 아닌 25s, 25h와 같은 방식으로 설정하여 시간 단위를 지정할 수 있다.
이렇게 할 경우 @DurationUnit(ChronoUnit.SECONDS)을 생략 가능하다.
- ns for nanoseconds
- us for microseconds
- ms for milliseconds
- s for seconds
- m for minutes
- h for hours
- d for days
자세한 내용은 doc 링크를 확인해 보자.
간단하게 살펴보면 @Validated를 사용하여 값을 검증할 수도 있다.
아래와 같이 @NopEmpty를 사용하면 name값에 바인딩할 값이 properties파일에 설정되어 있지 않을 경우 실행 과정에서 에러를 발생시킨다.
@Validated에 관한 내용은 범위가 넓으므로 따로 포스팅을 해봐야겠다.
@Component
@ConfigurationProperties("my")
@Validated
public class MyProperties {

    @NotEmpty
    String name;

    int age;

    String fullName;

    private Duration sessionTimeout = Duration.ofSeconds(30);
}
약간의 팁은 properties 파일을 작성하기 전에 먼저 class파일을 만들었다면, properties파일에서 meta 정보를 이용하여 자동완성을 사용할 수 있다. 이때 spring-boot-configuration-processor jar을 사용하여 @ConfigurationProperties로 주석이 달린 항목에서 자체 구성 메타 데이터 파일을 쉽게 생성할 수 있다.
아래 doc 링크에서 확인해 보자.
링크
해당 포스팅은 백기선 님의 인프런 강의를 참고하여 작성하였습니다.
'Java & 스프링 > 스프링부트 톺아보기' 카테고리의 다른 글
| [스프링 부트] 로깅 (0) | 2019.10.07 |
|---|---|
| [스프링 부트] 프로파일 (0) | 2019.10.03 |
| [스프링 부트] 외부 설정 적용 하기 (0) | 2019.09.24 |
| [스프링부트] 이벤트 리스너 (0) | 2019.09.24 |
| [스프링 부트] 스프링 인스턴스 사용해보기 (0) | 2019.09.23 |


댓글